
Testing LiveView with Playwright
We've recently been working heavily with Phoenix LiveView at work and having a great time. It's fantastic working in a way that keeps all the code in one place, primarily using one language (Elixir).
Another huge advantage we're finding is that we don't have to create API endpoints for everything. We can just call functions in the LiveView module directly from the client. This is a huge win for us, as we're able to keep the codebase much simpler, it's also reducing the number of communication errors where we can have a mismatch between the API and the client.
We're a big Ember.js shop and as a result are used to writing sophisticated acceptance and integration tests for our products.
Phoenix and LiveView have great support for a lot of the functional testing we've done elsewhere. Great for testing individual components, but we're finding it a bit more challenging to test the full flow of the application.
Because Ember is a JS framework, it's very easy to boot the application in a clean state, set a baseline data state and then interact with the application in a way that simulates a user. The reason this is easy is because you're in full control of the stack and there's no need to have a running server to handle the data side of things.
Why is Phoenix LiveView different?
Phoenix LiveView is a server-side rendered framework. This means that the server is responsible for rendering HTML and sending it to the browser. Some JavaScript code then connects to the server via websocket and then we have a two way, long lived connection backed by a long lived stateful process on the server.
This is very different to a single page application (SPA) and it means we really need the server, with its state in order to properly test the application. This poses a number of specific challenges.
We'd like to have the added confidence of end-to-end tests, but we found little in the way of guides to doing end to end testing. There's some information on using Wallaby, which is a great library, but it's not quite what we're looking for. There's an implementation of Playwright for Elixir, but it's not quite as mature as the JavaScript version and currently only supports Chromium.
As a way of remedying this, we've been looking at using the native Node.js Playwright to test our LiveView applications. This presented a number of challenges, such as:
- Database isolation
- Authentication
- Data fixtures
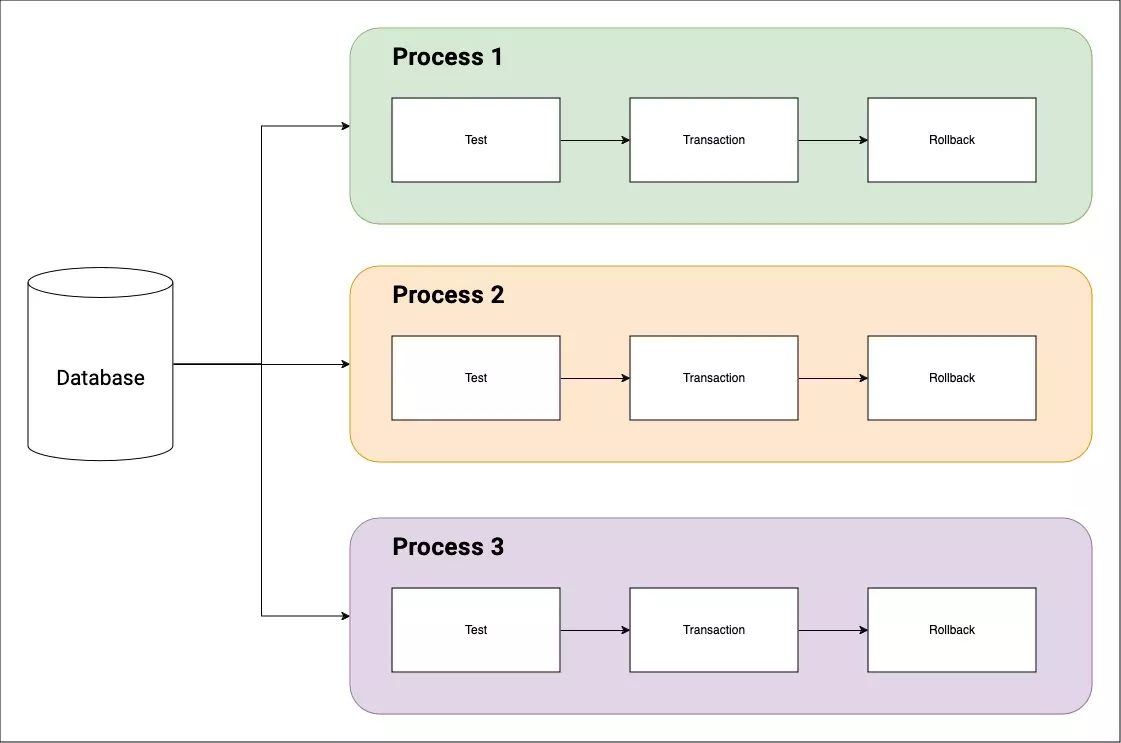
Database isolation
Let's start with database isolation as it's foundational for all the other problems that need to get solved.
With Phoenix apps we typically use Ecto for database access. Ecto is a fantastic library that allows us to interact with the database in a very functional way.
In the test environment, Ecto provides an adapter that allows us to run tests in a transaction. This means that we can run a test, insert some data, run the test and then roll back the transaction. This is great because it means that we can run tests concurrently and not have to worry about data from one test interfering with another and we can assure ourselves of a pristine state between tests.
All of this is usually handled automatically by using an ExUnit test case that sets up the database and rolls back the transaction for us. As each test is executed in its own process, the mechanism for isolation is very straightforward.
Prior to each test, a bit of setup code is executed which handles creating a transaction for the current test. When this process is terminated, the transaction is automatically rolled back, leaving the database in pristine state.
You'll likely have a bit of code that looks like this in your data_case.ex if you have a Phoenix project.
def setup_sandbox(tags) do
  pid = Ecto.Adapters.SQL.Sandbox.start_owner!(Snappy.Repo, shared: not tags[:async])
  on_exit(fn -> Ecto.Adapters.SQL.Sandbox.stop_owner(pid) end)
end
This is very nice and automated, but this won't help us if we want to drive the application like a user.
Database isolation for browser based testing
There's some complexity in getting database isolation working when driving the application from the browser. We can't rely on the test isolation mechanism that we have in ExUnit because we're not running the tests in the same process.
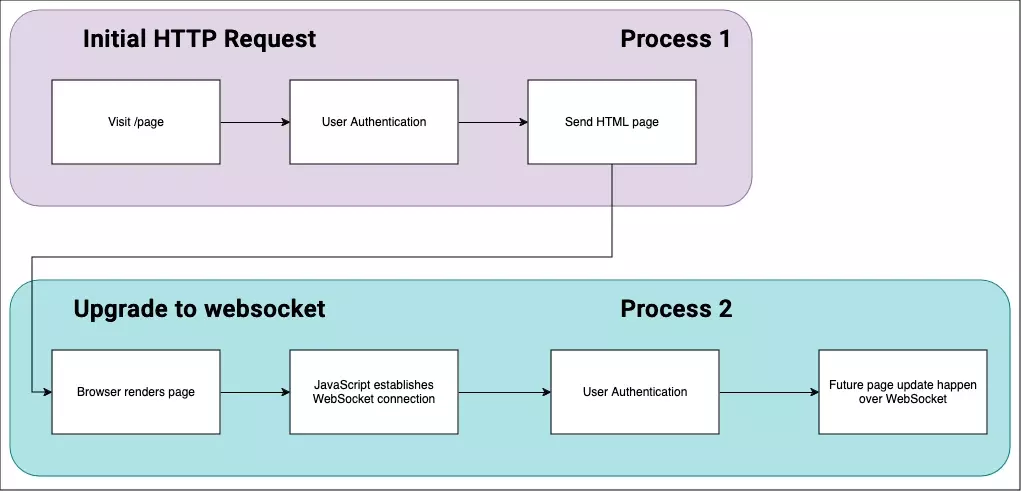
The reason for this is that when we start up a LiveView, we start off with an initial HTTP request, which runs in its own Process. This generates the HTML and sends it to the browser. At this point the Process is terminated. The browser then connects to the server via a websocket and we have a long lived connection, but it's in a new Process. Additionally, neither of these processes are the same as the one that's running the test.
Because the first Process is terminated, any user that had been created for the test would no longer exists and so when the LiveView tries to connect to the server, authentication would fail.
Allowing alternative ways of managing transactions
One way to solve this is to allow for alternative ways of managing transactions. We could have a way of starting a transaction in the test and then rolling it back at the end of the test. Luckily, Phoenix.Ecto provides a way to do this.
Enter Phoenix.Ecto.Sandbox.
With Phoenix.Ecto.Sandbox we can allow the browser to send metadata with each request that identifies the transaction that it's part of. This allows us to create data needed for the test and then roll it back at the end of the test.
This is a bit more complex than the ExUnit test case, but it's still very manageable.
To make this work, we need to do a few things:
- Add a plug to our
endpoint.exthat will provide a way of getting metadata. - Allow that metadata to be read as part of the LiveView session setup.
- Use the metadata to allow the LiveView to work within the correct transaction.
Adding a plug to the endpoint
The plug we're adding shouldn't exist outside the test environment, so we'll wrap it in a conditional that checks if we're in the test environment.
# /config/test.exs
config :my_app, sandbox: true
And then
# /my_app_web/endpoint.ex
defmodule MyApp.Endpoint do
  use Phoenix.Endpoint, otp_app: :my_app

  if Application.compile_env(:my_app, :sandbox) do
    plug Phoenix.Ecto.SQL.Sandbox,
      at: "/sandbox",
      repo: MyApp.Repo,
      # the default
      timeout: 15_000
  end
end
This creates an endpoint at /sandbox that we can use to get metadata by sending a POST request to create a session and a DELETE request to clean up a session. What we get back looks something like this BeamMetadata (g2gCdwJ2MXQAAAADdwVvd25lclh3DW5vbm9kZUBub2hvc3QAAAUdAAAAAAAAAAB3CXRyYXBfZXhpdHcEdHJ1ZXcEcmVwb2wAAAABdxlFbGl4aXIuUm9zdGVyLlJlcG9CYWNrZW5kag==).
The stuff in the parentheses is the metadata that we're interested in and happens to be a base64 encoded string. We can decode this:
iex(1)> {:ok, data} = Base.decode64("g2gCdwJ2MXQAAAADdwVvd25lclh3DW5vbm9kZUBub2hvc3QAAAUdAAAAAAAAAAB3CXRyYXBfZXhpdHcEdHJ1ZXcEcmVwb2wAAAABdxlFbGl4aXIuUm9zdGVyLlJlcG9CYWNrZW5kag==")
{:ok,
 <<131, 104, 2, 119, 2, 118, 49, 116, 0, 0, 0, 3, 119, 5, 111, 119, 110, 101,
   114, 88, 119, 13, 110, 111, 110, 111, 100, 101, 64, 110, 111, 104, 111, 115,
   116, 0, 0, 5, 29, 0, 0, 0, 0, 0, 0, 0, 0, 119, ...>>}
This is a binary that we can convert to a term:
iex(2)> :erlang.binary_to_term(data)
{:v1, %{owner: #PID<0.1309.0>, trap_exit: true, repo: [MyApp.Repo]}}
And now we can see that it gives us the PID of the owner of the transaction and the repo that we're using.
Using the metadata in the LiveView
To allow the metadata to be used in the LiveView, we need to add some extra configuration to the session setup.
We're going to do this by including the metadata as part of the UserAgent for the browser. It's also possible to use a header, like X-Beam-Metadata, but unfortunately Playwright doesn't pass headers along for WebSocket connections, so we won't bother with that. There's an open issue here, so using headers might be a reasonable approach in the future.
All we're adding here is the :user_agent atom to the connect_info.
  socket "/live", Phoenix.LiveView.Socket,
    websocket: [connect_info: [:user_agent, session: @session_options]]
We'll next use this data in a custom mount function used in our live view (the name of the module is up to you). I've chosen to put it in test_support so that it will not be available outside the test environment.
# test/support/live_acceptance.ex
defmodule MyApp.Mounts.LiveAcceptance do
  def on_mount(:default, _params, _session, socket) do
    %{assigns: %{phoenix_ecto_sandbox: metadata}} =
      Phoenix.Component.assign_new(socket, :phoenix_ecto_sandbox, fn ->
        if Phoenix.LiveView.connected?(socket), do: Phoenix.LiveView.get_connect_info(socket, :user_agent)
      end)

    Phoenix.Ecto.SQL.Sandbox.allow(metadata, Ecto.Adapters.SQL.Sandbox)
    {:cont, socket}
  end
end
By assigning the metadata to the phoenix_ecto_sandbox key in the assigns, Phoenix will automatically ensure that the transaction is used for the LiveView.
We also want to ensure that the mount is run for all LiveViews in the test environment. We can do this by adding a conditional to the live_view function in app_web.ex.
# my_app/app_web.ex

def live_view do
  quote do
    use Phoenix.LiveView
    # ...

    if Application.compile_env(:my_app, :sandbox) do
      on_mount MyApp.LiveAcceptance
    end

    # ...
  end
end
Running the server in tests
In order to have your endpoint running and available to serve HTTP requests, we need to enable it. So we set up the ip and port we wish to use and set the server to true.
# /config/test.exs
config :my_app, MyApp.Endpoint,
  http: [ip: {127, 0, 0, 1}, port: 4002],
  server: true
With that in place, we now have a way to run browser based tests with database isolation. We're not quite done yet though, we still need to configure the browser to send the metadata, and work out how to set up fixture data.
Teaching Playwright to work with database transactions
I've chosen to colocate Playwright with our project in a top level playwright folder.
I created the starter code via pnpm create playwright and following the prompts. There's a bunch more information on the Playwright website.
I've chosen to get playwright to start up the test server as part of the test run, so this config is added
I'm assuming that the test run will be executed from the playwright directory, so cwd is set to ../. This basically tells playwright to execute the command one level higher.
Then we specify command, ensuring to set the env so that we're running in the correct environment.
Our application provides an endpoint to check if it's running, so we provide that as the url so Playwright can perform a health check, you could just use the root URL.
reuseExistingServer is set to true when outside of CI so we can choose to keep an instance of the test server running all the time and reduce boot times. It's also helpful if you want to debug things in iex.
  /* Run your local dev server before starting the tests */
webServer: {
  // Move up a level
  cwd: '../',
  command: 'env MIX_ENV=test mix phx.server',
  // Used by playwright to check if the server is running
  url: 'http://localhost:4002/up',
  stdout: 'pipe',
  reuseExistingServer: !process.env.CI,
},
In the package.json we have some scripts for convenience.
"scripts": {
  "playwright-install": "playwright install",
  "test": "playwright test",
  "playwright:ui": "playwright test --ui"
},
"
We can now run the tests with pnpm test and we should see the server start up and the tests will run (once we create them!).
Database transactions in Playwright
Playwright has the concept of fixtures, which are objects that can be used to set up many things, such as the browser and the page.
We can customise the fixtures to perform various pieces of setup for us.
For now we want to:
- Start a transaction before the test
- Set the browsers
User-Agentto include the metadata with each request - Clean up after the test
First in the test-support directory for playwright, we'll create a setup.ts file. This is the first iteration of the file, we'll add more to it later (like being able to setup database fixtures).
This file will be imported and used in the tests and replaces the standard import { test, expect } from '@playwright/test';.
By extending the test object and overriding the page function we can ensure we have an interface that will match most Playwright examples you'll find around the internet.
import {
  test as baseTest,
  BrowserContext,
  expect,
  Page,
} from '@playwright/test'

interface TestMetadata {
  page: Page
}

export const test = baseTest.extend<TestMetadata>({
  page: async ({ browser }, use) => {
    // This checks out the DB and gets the user agent string
    const resp = await fetch('http://localhost:4002/sandbox', {
      method: 'POST',
    })

    const userAgentString = await resp.text()

    // We setup a new browser context with the user agent string
    // This allows the database to be sandboxed and provides isolation
    const context = await browser.newContext({
      baseURL: 'http://localhost:4002',
      userAgent: userAgentString,
    })

    const page = await context.newPage()

    await use(page)

    await fetch('http://localhost:4002/sandbox', {
      method: 'DELETE',
      headers: {
        'user-agent': userAgentString,
      },
    })
  },
})
export { expect }
It's important to note that the commands here are executed in a Node.js environment, not the actual browser running the tests.
- First we hit our test server's sandbox endpoint with a POST request. Note that the URL is hardcoded here, but you could pass it in as an environment variable or some other form of configuration.
- We then extract the user agent string from the response.
- We then create a new browser context with the user agent string and a baseURL. The baseURL is a quality of life feature that allows us to use relative URLs in our tests.
- Using the browser context, we create a new page and pass it to the
usefunction. The use means that we can provide thispageto the test function. - After the test has finished using the page, we clean up by hitting the sandbox endpoint with a DELETE request.
We can now create tests that will run with database isolation.
// playwright/tests/my-test.spec.ts
import { test, expect } from '../test-support/setup'

test('Doing things!', async ({ page }) => {
  await page.goto('/')

  expect(await page.title()).toMatch('Welcome to Phoenix!')
})
Executing pnpm test will now run the test and (assuming you have the correct page title set at you root URL) it should pass.
Now this isn't super useful yet, but we can now start to build up the fixtures to allow us to do more complex things.
Authentication
It's pretty straightforward to add authentication steps to the setup if you have a standard username/password login flow, but if you're using OAuth, we have a problem! How do we set up a user and authenticate them?
We could run an instance of our OAuth server in the test environment with some prebaked users, but this adds a lot of complexity to the tests and makes them more brittle. We could disable the OAuth flow in the test environment, but then we're not testing the full application. We could mock out the OAuth code in the test environment, but again we're not testing the full application and run the risk of missing authentication bugs.
What we'll do, instead, is provide a way to set up a user in the database and then authenticate them in the test environment.
Creating a fixture controller
Let's start with adding a route that will allow us to create a scenario and handle user authentication. Again, we're wrapping it in a compile time conditional, ensuring that it's only available in the test environment.
# router.ex
if Application.compile_env(:my_app, :sandbox) do
  scope "/e2e" do
    post "/setup_fixtures/:name", E2EFixtureController, :setup
  end
end
Now in the controller, we'll add a way to create a user, authenticate them for a named scenario.
What's happening here is:
- We're extracting the scenario name from the request parameters.
- We're extracting the metadata from the user agent string.
- We're building the scenario based on the scenario name.
- We're logging the user in.
- We're setting the session with the user data.
It's not super complicated, but there's a lot going on at first glance.
# test/support/e2e_fixture_controller.ex
defmodule E2EFixtureController do
  use MyApp, :controller

  def setup(conn, %{"name" => scenario_name}) do
    # Extract the metadata from the user agent
    case Plug.Conn.get_req_header(conn, "user-agent") do
      [beam | _] ->
        # Allow this process to use the associated transaction
        Phoenix.Ecto.SQL.Sandbox.allow(beam, Ecto.Adapters.SQL.Sandbox)
    end

    # Build the scenario
    scenario =
      case scenario_name do
        "normal-user" ->
          build_normal_user()
      end

    # Log the user in
    conn
    |> login_user(scenario)
    |> send_resp(200, "")
  end

  def build_normal_user do
    # This is where you'd create a user in the database and any other setup you need for the scenario
    logged_in_user = Fixtures.build_user()

    %{logged_in_user: logged_in_user}
  end

  def login_user(conn, %{logged_in_user: %{id: user_id}}) do
    # We're using Guardian for authentication, so we'll create a JWT and sign it
    claims =
      %{}
      |> Map.put("id", user_id)

    {:ok, jwt, claims} = RosterWeb.Guardian.encode_and_sign(%{id: "user"}, claims, secret: "foo")

    conn
    # This is where you'd handle logging the user in to your application
    |> SSOClient.Conn.login_user(%{
      jwt: jwt,
      user: claims,
      refresh_token: ""
    })
    # Setting the session here will ensure that the appropriate cookies are set
    |> Plug.Conn.put_session(:user, claims)
    |> Plug.Conn.put_session(:refresh_token, "dummy-rt")
  end
end
Using the fixture controller in Playwright
Now that we have a way to set up a user and authenticate them, we can use this in our Playwright tests.
See the updates to the setup.ts file below.
The important part is the page.request.post call. This is a Playwright specific function that allows us to make a HTTP request in the browser context. This is important because it will mean that the session cookies are set in the browser and the user will be authenticated for subsequent requests.
// setup.ts
import {
  test as baseTest,
  BrowserContext,
  expect,
  Page,
} from '@playwright/test'

interface TestMetadata {
  page: Page
  scenario: string
}

export const test = baseTest.extend<TestMetadata>({
  // We put this placeholder here so that we can use it in the page fixture
  // In test files, we replace with the actual scenario name
  // via `test.use({ scenario: 'scenario-name' })`
  scenario: '',
  page: async ({ browser, scenario }, use) => {
    // This checks out the DB and gets the user agent string
    const resp = await fetch('http://localhost:4002/sandbox', {
      method: 'POST',
    })

    const userAgentString = await resp.text()

    // We setup a new browser context with the user agent string
    // This allows the database to be sandboxed and provides isolation
    const context = await browser.newContext({
      baseURL: 'http://localhost:4002',
      userAgent: userAgentString,
    })

    const page = await context.newPage()

    // page.request allows us to execute a HTTP call in the actual browser context
    // It's used for setting up fixtures in the database
    // and will also allow the created user to be logged in
    // via a cookie returned in the response
    await page.request.post(
      `http://localhost:4002/e2e/setup_fixtures/${scenario}`,
      {
        headers: {
          'user-agent': userAgentString,
        },
      }
    )

    await use(page)

    await fetch('http://localhost:4002/sandbox', {
      method: 'DELETE',
      headers: {
        'user-agent': userAgentString,
      },
    })
  },
})

export { expect }
With all this in place we can now create tests that require an authenticated user.
With the test.use function, we can set the scenario that we want to use for the tests in the file, passing along the scenario name.
// playwright/tests/my-authenticated-test.spec.ts
import { test, expect } from '../test-support/setup'

test.use({ scenario: 'normal-user' })

test('Doing authenticated things!', async ({ page }) => {
  await page.goto('/dashboard')

  expect(await page.title()).toMatch('Welcome to Authenticated User!')
})
Playwright UI
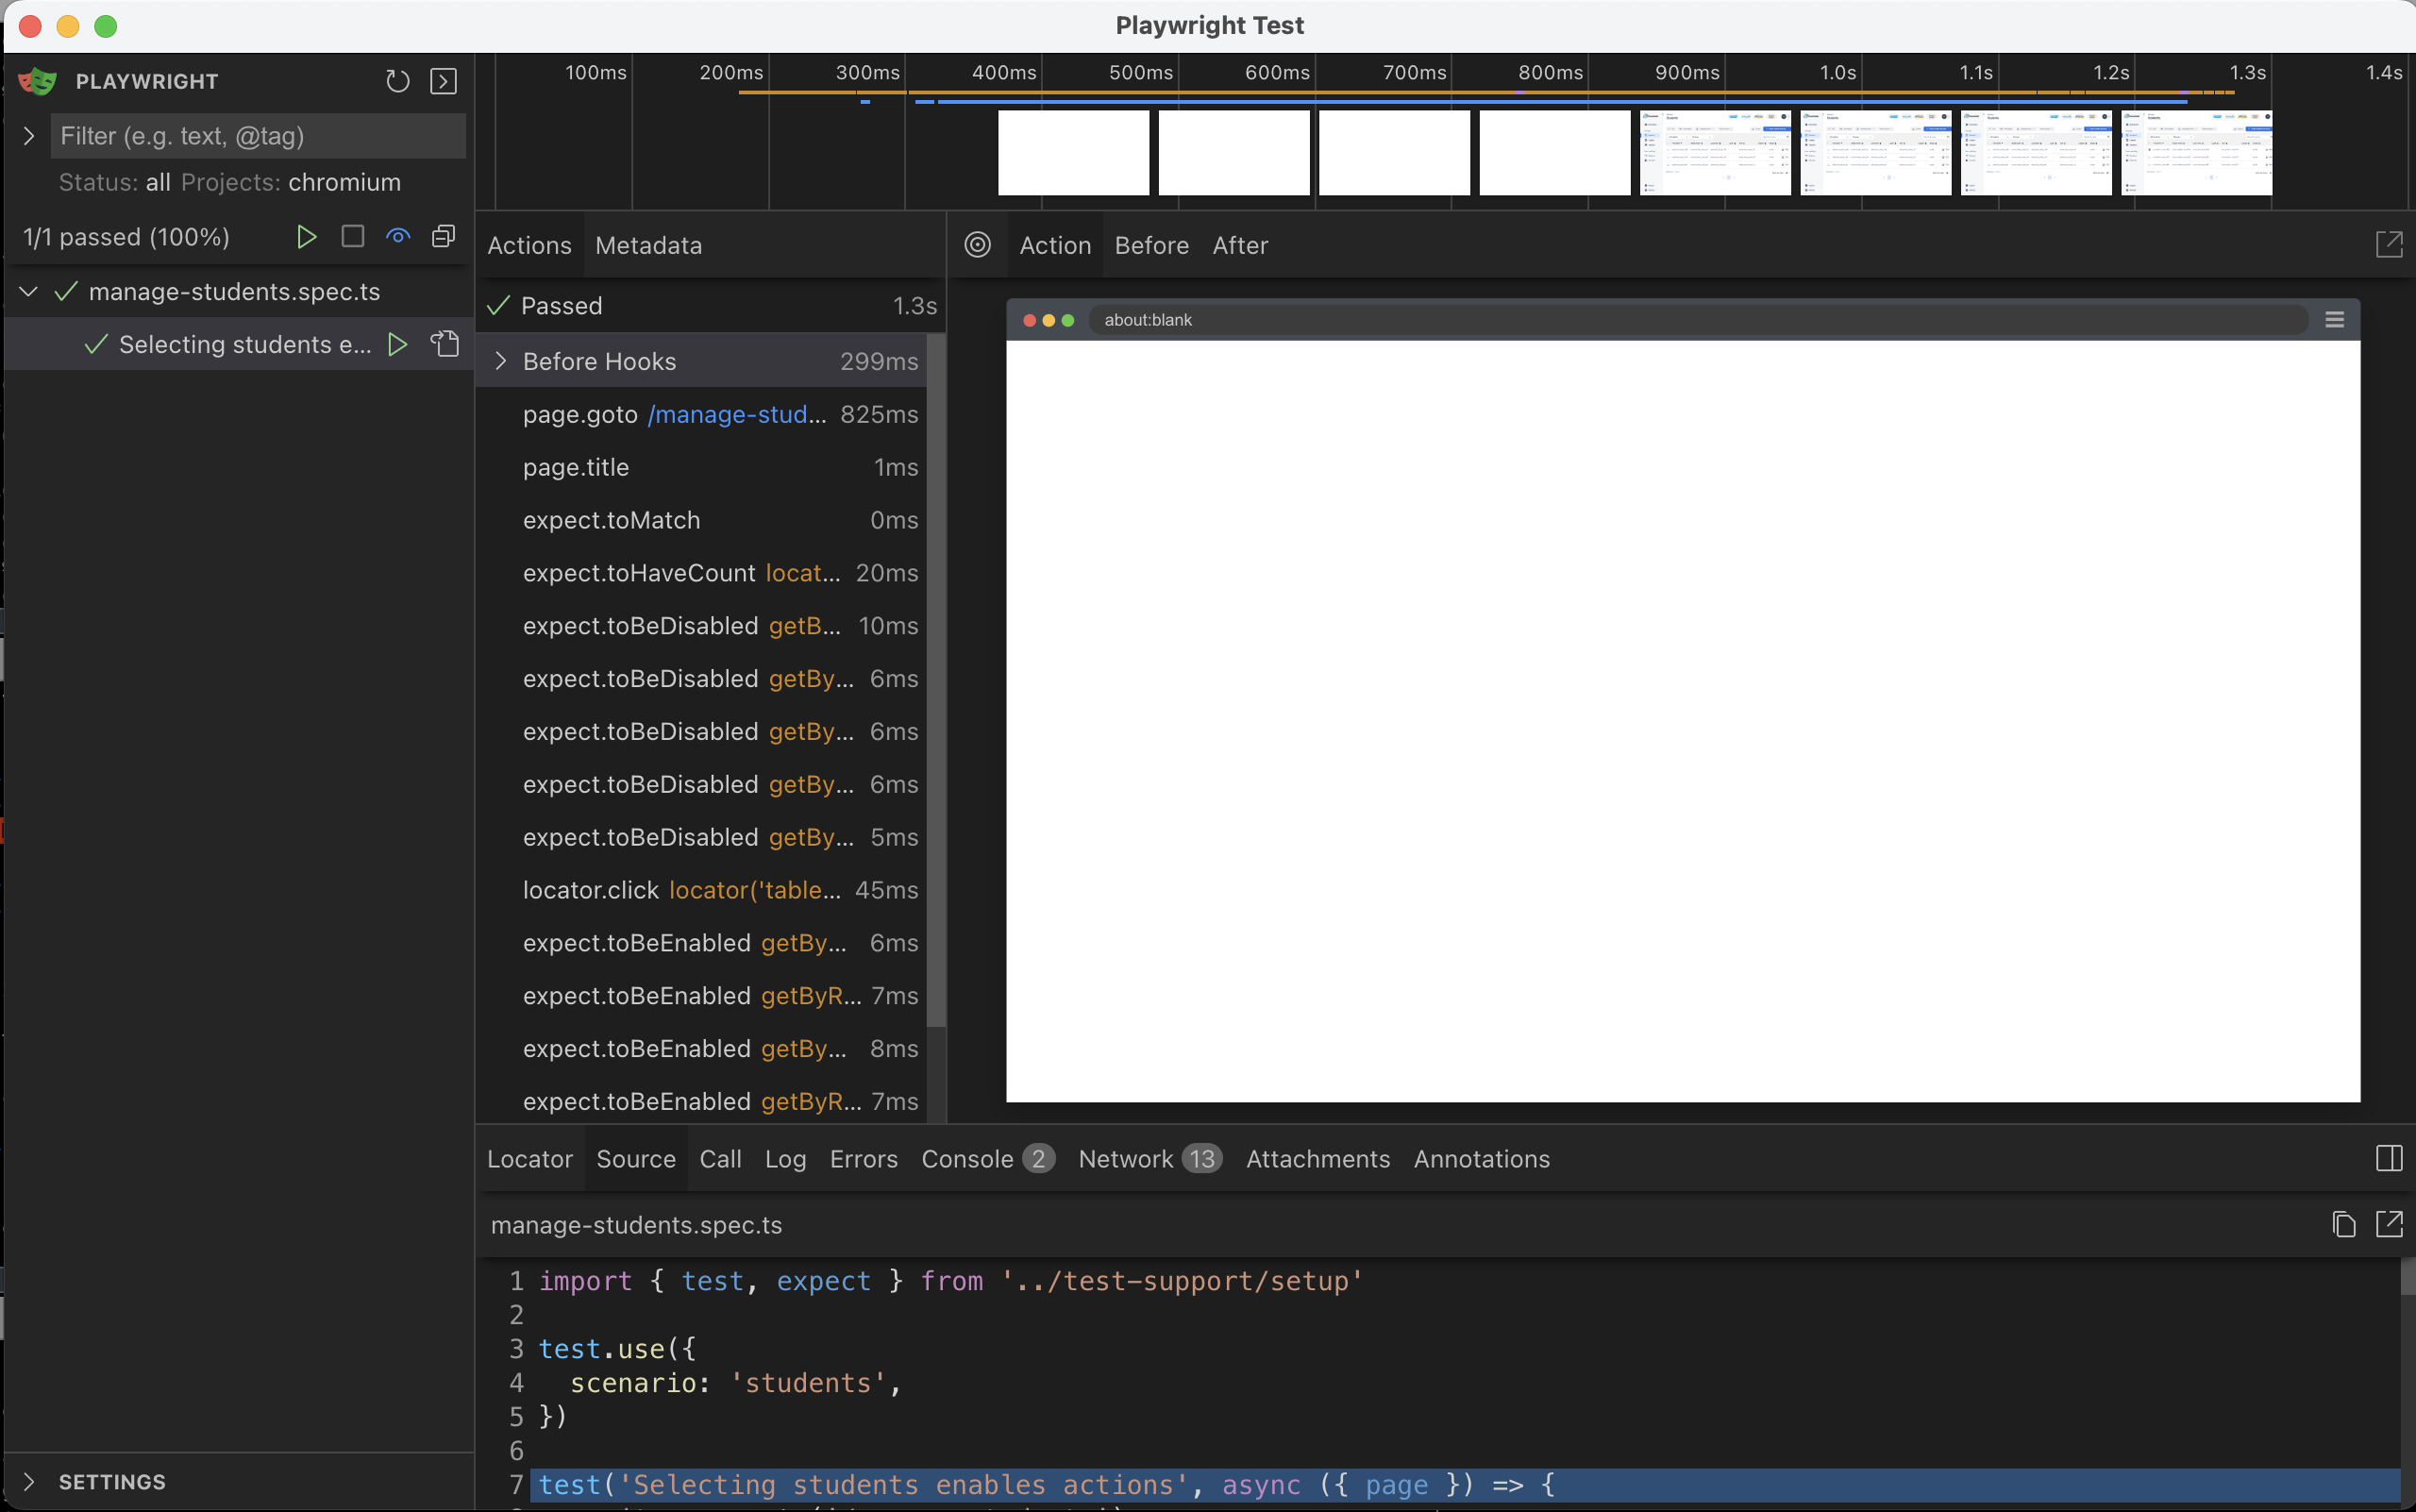
In the scripts section earlier I added a command playwright:ui. This will start the Playwright UI, which is a nice way to run tests and see what's happening in the browser.
It allows you to repeatedly run your tests and visually inspect them at various points in time. It also allows you to create 'locators' for running assertions, see console output and a whole lot more. It's super helpful and another reason why we pushed to used native Playwright rather than the Elixir version.
Conclusion
It was a bit of a journey to get to this point, but we now have a way to run browser based tests with database isolation and authentication. This is a huge win for us as it allows us to test the full application in a way that will give use great confidence that our users will have a great experience.